CHROME EXTENSION

Browser Recording
Extension

Continuous browser tab recording for process discovery. Capture screen and audio directly from Chrome.

v0.1.0
Version
109+
Chrome
VP9
WebM Format
01

Installation

02

Getting Started

1

Open the extension

Click the Chronos extension icon in the Chrome toolbar. If you don't see it, click the puzzle piece icon and pin Chronos.

2

Grant microphone permission

On first use, the extension requests microphone access. Click "Allow" in the initial prompt.
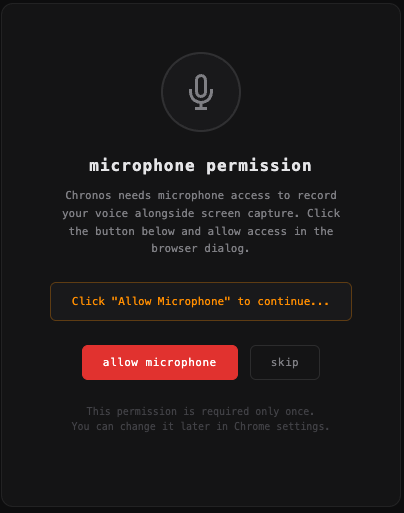
Extension microphone permission request

After clicking Allow, Chrome shows a second dialog asking how long to grant access. Select "Allow while visiting the site" for the best experience.

!
If you choose "Allow this time", Chrome will ask again on every new session. If you skip or deny this prompt, the extension will ask again each time you try to record.
3

Click the record button

The extension popup shows the ready state with a gray status indicator. Click the record button to begin.
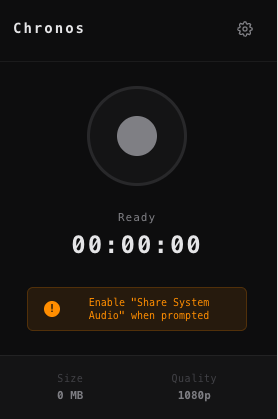
Extension ready state
4

Choose what to share and enable system audio

Chrome shows the "Choose what to share with Chronos" dialog. You can select a Chrome Tab, Window, or Entire Screen. At the bottom, find the "Also share system audio" toggle — it is off by default and must be turned on.
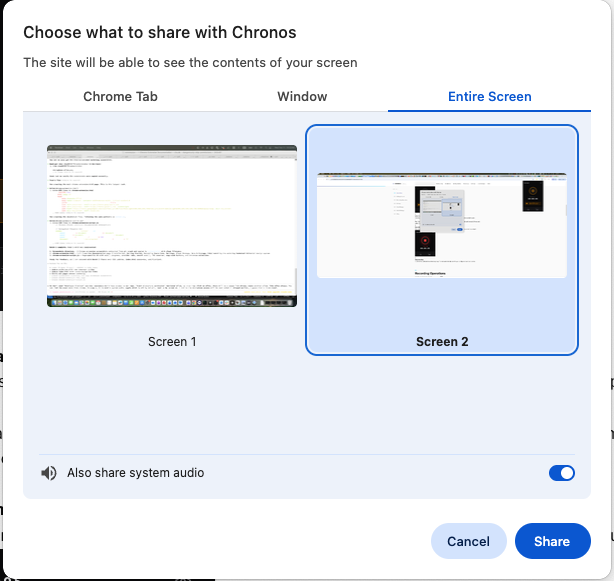
Chrome sharing dialog — Choose what to share with Chronos, with Also share system audio toggle
!
The "Also share system audio" toggle is critical for capturing application sounds. It is off by default — you must enable it before clicking Share. Without it, only microphone audio (if enabled) will be recorded.
5

Recording in progress

After clicking Share, recording begins. The extension shows a live timer, file size indicator, and a stop button.
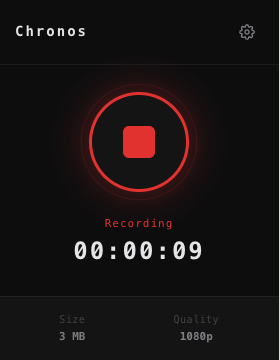
Extension recording in progress

A banner appears at the bottom of your screen confirming "Chronos is sharing your screen and audio." You can click Hide to dismiss the banner, or Stop sharing to end the recording.

Chrome banner — Chronos is sharing your screen and audio, with Stop sharing and Hide buttons

You can close the extension popup and continue working normally. The recording runs in the background and the banner will remain visible at the bottom of the screen as a reminder. You do not need to keep the extension popup open.

6

Stop recording

Click the stop button in the extension popup, or click "Stop sharing" in the Chrome banner. Files are automatically saved to your configured download location.

03

Recording Operations

Status Indicators
State Indicator Description
Ready Gray circle Extension loaded, ready to record
Recording Red pulsing dot + timer Active recording with elapsed time and file size display
!
Recording must be started manually by the user each time. If the computer goes to sleep or the sharing stream is interrupted, recording stops automatically and will not resume on its own — you will need to start a new recording.
Chunk Segmentation
Recordings are automatically split into 60-second chunks
Each chunk is an independently playable WebM file
Chunks are saved as they complete — no data loss on interruption
Auto-recovery on service worker restart
04

Settings & Configuration

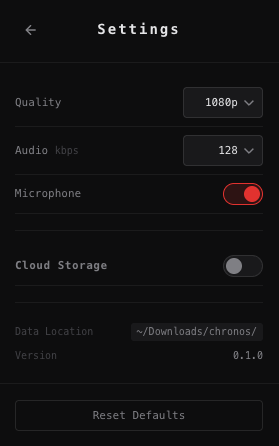
Settings panel
Configuration Parameters
Parameter Description Default
Quality Video resolution preset — 720p, 1080p, 1440p, 4K, or Custom 1080p
Audio Bitrate Audio encoding quality — 96, 128, 192, or 256 kbps 128 kbps
Microphone Enable/disable microphone recording alongside tab audio Enabled
Data Location Download directory for recorded files ~/Downloads/chronos/
Storage Notes
Storage usage varies depending on resolution, whether audio is enabled, and screen content complexity
If cloud storage is configured, recordings are automatically uploaded to your cloud provider
Without cloud storage, recordings are saved locally to the Downloads folder
05

Cloud Storage Setup

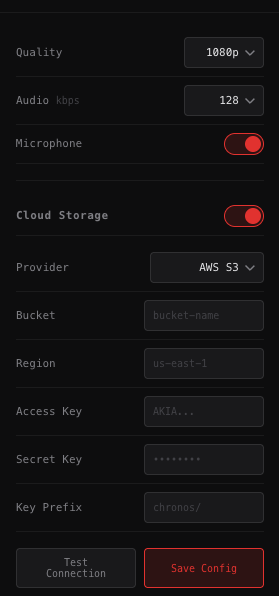
Cloud storage settings
!
CORS configuration required. All cloud storage providers must have CORS (Cross-Origin Resource Sharing) configured to allow uploads from the Chrome extension. Set the allowed origin to * (or your specific extension origin) on each bucket/container. Without this, uploads will fail with a network error.
Extension Fields
Field Description Example
Bucket S3 bucket name chronos-recordings
Region AWS region identifier us-east-1
Access Key IAM user access key ID AKIA...
Secret Key IAM user secret access key wJal...
Prefix Optional key prefix (folder path). Can be left empty. recordings/
Setup Steps
1
In the AWS Console, create an S3 bucket (or use an existing one)
2
Create an IAM user with S3 write permissions (e.g., AmazonS3FullAccess policy or a custom policy with s3:PutObject and s3:ListBucket)
3
Generate an access key for the IAM user (Security credentials → Access keys → Create access key)
4
Set CORS on the bucket: go to Bucket → Permissions → CORS configuration, and add an allowed origin of * with methods GET, PUT, POST
5
Enter the credentials in the extension settings and click "Test Connection"
CORS Configuration (S3 Bucket)
[
  {
    "AllowedHeaders": ["*"],
    "AllowedMethods": ["GET", "PUT", "POST"],
    "AllowedOrigins": ["*"],
    "ExposeHeaders": ["ETag"]
  }
]
Extension Fields
Field Description Example
Storage Account Azure Storage account name chronosstorage
Bucket Blob container name recordings
Access Key Storage account access key abc123...
Prefix Optional blob name prefix. Can be left empty. recordings/
Setup Steps
1
In the Azure Portal, open your Storage Account (or create one)
2
Create a blob container under Data storage → Containers
3
Copy the access key: go to Security + networking → Access keys → Show → copy Key
4
Set CORS: go to Security + networking → Resource sharing (CORS), add a rule with allowed origin *, methods GET, PUT, POST, allowed headers *
5
Enter the credentials in the extension settings and click "Test Connection"
CORS Configuration (Azure Portal)
Allowed origins:  *
Allowed methods:  GET, PUT, POST
Allowed headers:  *
Exposed headers:  ETag
Max age (seconds): 3600
Extension Fields
Field Description Example
Bucket GCS bucket name chronos-recordings
Region Bucket region us-central1
Access Key HMAC access key ID (from service account) GOOG1E...
Secret HMAC secret (from service account) bGoa+V...
Prefix Optional object name prefix. Can be left empty. recordings/
Setup Steps
1
In the Google Cloud Console, create a GCS bucket (or use an existing one)
2
Create a service account with Storage Admin role (IAM & Admin → Service Accounts → Create)
3
Generate HMAC keys for the service account: go to Cloud Storage → Settings → Interoperability → Create a key for a service account
4
Set CORS on the bucket using gsutil or the Cloud Console (see CORS config below)
5
Enter the HMAC access key and secret in the extension settings and click "Test Connection"
CORS Configuration (GCS Bucket)
[
  {
    "origin": ["*"],
    "method": ["GET", "PUT", "POST"],
    "responseHeader": ["Content-Type"],
    "maxAgeSeconds": 3600
  }
]
Extension Fields
Field Description Example
Endpoint MinIO server URL https://minio.company.com
Bucket Target bucket name chronos-recordings
Access Key MinIO access key minioadmin
Secret Key MinIO secret key minioadmin
Region Optional. Can be left empty for most MinIO setups.
Prefix Optional key prefix. Can be left empty. recordings/
Setup Steps
1
Access your MinIO Console and create a bucket
2
Create an access key (or use existing credentials with write permissions to the bucket)
3
Ensure CORS is configured on the MinIO server to allow origin * with methods GET, PUT, POST (see config below)
4
Enter the credentials in the extension settings and click "Test Connection"
CORS Configuration (MinIO)
{
  "CORSRules": [
    {
      "AllowedHeaders": ["*"],
      "AllowedMethods": ["GET", "PUT", "POST"],
      "AllowedOrigins": ["*"],
      "ExposeHeaders": ["ETag"]
    }
  ]
}
Upload Behavior
Completed chunks are automatically queued for upload
Failed uploads retry with exponential backoff
Concurrent upload limit prevents bandwidth saturation
Use "Test Connection" to verify credentials before saving
06

FAQs & Troubleshooting

01 Why can't I hear system audio in my recordings? +
When Chrome's sharing dialog appears, you must enable the "Also share system audio" toggle at the bottom. It is off by default. Without it, only microphone audio (if enabled) is captured. If you missed it, stop the recording and start again — the toggle appears each time.
02 Where are my recordings saved? +
If cloud storage is configured, recordings are automatically uploaded to your cloud provider. Without cloud storage, recordings are saved locally to the Downloads folder. You can change the local path in the extension settings.
03 Do I need to start recording manually? +
Yes. Recording must be started manually each time by clicking the record button in the extension popup. There is no auto-start feature — the user must initiate each recording session.
04 What happens if my computer goes to sleep? +
If the computer goes to sleep, the recording stops automatically. When the computer wakes up, recording does not resume on its own — you will need to start a new recording session manually.
05 How do I change recording quality? +
Open the extension popup and click the settings gear icon. Choose from preset quality options (720p, 1080p, 1440p, 4K) or set a custom resolution. Changes take effect on the next recording.
06 Can I record multiple tabs simultaneously? +
No. Chrome's capture API allows only one active recording at a time. To record a different tab or screen, stop the current recording first. For multi-monitor continuous monitoring, use the Chronos desktop application instead.
07 The extension shows "Recording" but Chrome's sharing stopped — what happened? +
The sharing stream can be interrupted if the tab navigates to a restricted page, the tab is closed, or you clicked "Stop sharing" in the Chrome banner. Stop the recording in the extension and start a new one to resume capture.
08 How much storage does recording use? +
Storage usage varies depending on resolution, whether audio is enabled, and the complexity of the screen content being recorded. Higher resolutions and dynamic content produce larger files. Reducing quality to 720p significantly reduces storage usage. Enable cloud storage to automatically offload recordings.
09 How do I set up cloud storage? +
Open extension settings, scroll to Cloud Storage, and select your provider (AWS S3, Azure Blob, Google Cloud, or MinIO). Enter your credentials and click "Test Connection" to verify. Important: you must also configure CORS on your cloud storage bucket to allow uploads from the extension. See the Cloud Storage Setup section for provider-specific steps.
10 Is my data sent to any server? +
No. All recordings are processed and stored locally on your machine. Data is only uploaded if you explicitly configure a cloud storage provider. The extension makes no external network requests otherwise.
11 How do I use this with the Chronos desktop app? +
The Chrome extension and desktop app can run simultaneously. The desktop app captures all monitors (full screen), while the extension captures individual browser tabs or screens with tab-level audio. Both can share cloud storage configuration. See the Desktop App documentation.